Showing posts with label painting. Show all posts

Friday, September 20, 2019

52 Weeks of Art: Week 12


Week 12: Acrylic Pouring


Welcome to week 12 of 52 weeks of art! What are we doing this week?


          Well, we're on to week 12 of this art adventure. Wow! I can't believe it's been 12 weeks already! That's nearly 1/4th of the way over with! Our art adventure took us to acrylic pouring this week. I have never done anything like this before. And, I'm going to be totally honest here, I never really wanted to do acrylic pouring. I always kind of looked at it like it was more of a craft than an art. I know! I am so sorry to all you acrylic pouring artists out there! This is more than just a craft. There really is some art to it. It's not just pouring some paint onto a canvas and letting it do its thing. It is so much more complicated than that!

I found this beautiful piece here.


The colorful creation was found here.
     Since I knew pretty much nothing about acrylic pouring, I headed to the internet! Thank you, Google for finding all the answers I needed. I found several sites that talked about how to do pouring. I honestly had no idea there was so much! You need a pouring medium, some silicone, some water, some paint (obviously), canvas, cups (so MANY cups), etc.

     The pouring medium, at least from what I researched, can be as cheap as using some Elmer's glue to using some fancy made-for-acrylic-pouring medium. I went with somewhere in between. I got some Floertol. It's used for house paint. It was MUCH cheaper than the fancy stuff. And, since I have never done any acrylic pouring before, I have no idea of the quality of it. I read that some people swear by the Floertol, others only use the fancy stuff. Everyone seems to have a completely different recipe for their pours.
      Another thing to add to the paint mixture is some silicone oil. It appears that the most commonly used oil is treadmill oil. Weird? I thought so. But, what do I know? I don't know anything about fluid art. A good substitute for the treadmill oil just so happens to be some coconut hair treatment that I happened to already own. Yay! 
    Alright, so, you've gathered up all your supplies, what now?
My supplies. All ready to begin.

     Here we've got the paint all mixed up. I used approximately (because I am terrible at actually measuring anything) 1 part paint, 1 part water, 1 part Floetrol, and a few drops of the coconut hair oil. I also used some plastic spoons to mix it all up because they fell out of the cupboard when I opened the door.

So much paint! 

     I took a tiny little cup - Solo makes some pretty great tiny cups, I'm pretty sure they are shot glasses, but I think they work pretty great for so many other things - I poured small amounts of different colors of paint into the cup and here we go! Paint poured all over the place.

My first pour! 
     I highly recommend that you make sure you are doing your pouring over SOMETHING that will catch all the paint that drips off. I just used some foil pans that I happened to have laying around the house. I keep saying I have these things laying around the house. They're actually put away. Most of the time. I love these foil pans. They can be used for just about anything and you can get sets of them at the dollar store. I love the dollar store.


Here is a "set" of paintings I did. I poured the paint over two canvases. 

     The Little one did some acrylic pouring as well. She had so much fun with this. Here's some paintings that she did. There are more, but these were my favorites.

The Little One did some acrylic pouring of her own.

     Here are the finished pieces all dried. It took HOURS for them to dry. I had to try to find some safe place in my house where no one would bump into them and get wet paint all over themselves - or the house. Not an easy task. One thing I noticed about these pours is that they were constantly changing. As the paint dripped off the edges the whole thing changed and created new patterns.


On to rating acrylic pouring...

     Just a reminder on the criteria for rating each medium.

Ease of use: How easy was this medium to use.

Affordability: How affordable supplies are for each medium.

Accessibility: How easily accessible supplies are for each medium. Example, are specific tools required that are hard to find?

Fun to Use: How much enjoyment I got out of using this medium

     So, for acrylic pouring, my rating is: 19

Ease of use: 5
    I don't think this could have possibly been any easier. The most difficult part was just stirring up the paint mixtures.

Affordability: 4
     Acrylic paint can be expensive, and if you plan on using a large canvas, you're gonna need a lot of paint. But you don't have to use the most expensive paints, you can go with the cheaper brands. The medium can be from just a few dollars to $40+. So, depending on what you're planning to do it could add up. 

Accessibility: 5
     Acrylic paints can be found just about anywhere. If you use glue as your medium, that can also be found anywhere. If you go with the Floetrol, that can be found at a hardware store. If you don't want to GO shopping, you can just buy everything online. In case you haven't noticed by now, I am a HUGE fan of buying online.

Fun to Use: 5
     This is much more fun to do than I thought it would be. I thought it would be just kind of meh. But it wasn't, it was exciting to see how the paints would mix and make different patterns. It was fun to watch as the painting would change slightly as if continued to move and flow around the canvas before it dried.


     If you would like to go on this epic art adventure with me, next week we will be doing...


     If you choose to follow along, please post your work using #52weekartadventure!

Friday, August 23, 2019

52 Weeks of Art: Week 8

Week 8: Spray Paint


Welcome to week 8 of 52 weeks of art! What are we doing this week?


     I don't know what I was thinking when I added spray paint to the list of mediums to do. I watched so many videos of people creating amazing pieces of art with spray paint and I was like, "What?! I can't do this!" Seriously. They all make it look so easy. And amazing.

It's like magic! How do they do this?

For reals? How?

A-maze-ing!

     So, watching all these videos did NOT help my confidence that I could pull this off. But, I was going to try it anyway. A lot of the artists used stencils. So, I thought I'd make my own stencils. Of what, though? Now, I'm no expert here - not even close - but it looked like doing some sky/space/cloud painting would be the easiest. I made myself a cloud stencil.


Those are clouds. 
     I thought I made my cloud stencil small enough. Turns out I did not. I'll show you later how not small my clouds are. Other than a stencil, I needed the most important part of spray painting. I needed spray paint! Instead of buying a bunch of paint, I just raided our garage for whatever my husband had. Apparently we own a LOT of spray paint. Here is just a small sampling of what we have. I pulled out some of the colors I thought we might use. I used mostly cool colors. Rebecca used all the colors.


Thanks to my husband we had lots of spray paint to choose from!

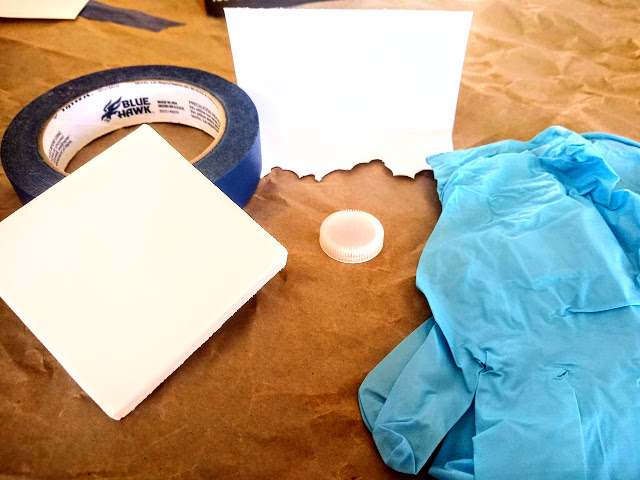
     Other supplies I needed included paper for the table I was using, tape, canvas, gloves, and a bottle cap. This is probably common sense stuff here, but you're going to want to spray paint outside. Not just because of the fumes, but you probably don't want over spray all over your house. Well, I didn't. Maybe you do. Who am I to judge?


     During my research into spray paint art I looked up the best paper to paint on. Do you know what they use? It's poster board. I never would have guessed that. Then again, I'm not a spray paint artist. You use the glossy side of the paper. Unfortunately, I didn't have any poster board. I did have some mini canvases, though. I gessoed them so the canvas wouldn't soak up the paint. My research suggested that I sand down the gesso... I did not. I was lazy. 

     How'd the spray paint art turn out? Take a look. I made a trio of paintings. The first one I tried was a space painting with a moon and some "clouds". This is where my not-small-enough cloud stencil didn't work out so great. I used the bottle cap to help me create the moon. I'm calling it a moon. It might not really look like it, but hey, it is what it is.


Moon, space, clouds

     It was like a billion degrees outside while we were painting. Alright, it was more like a hundred degrees. My point is, it was hot. SO hot. I left my paintings outside so they could bake in the sun. Here they are "baking".


Here's my trio of paintings. I just made some "space" for the other two paintings. Here they are drying.

     I really liked how my paper looked when I was finished with my painting.


I think there is more paint on the paper than there is on the canvas.
    After my paintings were dry I got some pictures. Because I didn't sand down the gesso you can really see the texture of the canvas. It's not as glossy and smooth as spray paint artists get. 


     Will I be doing spray paint art in the future? I don't know. It was fun, but it definitely will take practice if  I want to be any good at it. 


On to rating spray paint...

     Just a reminder on the criteria for rating each medium.

Ease of use: How easy was this medium to use.

Affordability: How affordable supplies are for each medium.

Accessibility: How easily accessible supplies are for each medium. Example, are specific tools required that are hard to find?

Fun to Use: How much enjoyment I got out of using this medium

     So, for spray paint, my rating is: 14

Ease of use: 3
    Not easy. At all. It was easy to accidentally spray over everything I just painted, though. Maybe if I was painting a larger surface it would have been easier, but painting a 3" x 3" canvas was difficult for me.

Affordability: 2
     I'll be honest here, I don't even know what type of spray paint is the best to use for art. I do know that you can get a can of paint at Home Depot for around $5. That's just for one color. If you're needing to use a lot of colors it'll add up quickly. I used 8 colors. If we didn't already have the paint, that would have cost me at least $40. So yeah, I'm going to say that spray paint isn't something that you can get in to on a budget. 

Accessibility: 5
     Luckily, if you do decide to try your hand at spray paint art, spray paint is available at any hardware store, the internet, and possibly at an arts and crafts store.

Fun to Use: 4
     I enjoyed spray painting. It did cause me some frustrations when I couldn't get things the way I wanted. Sometimes I would accidentally spray over the whole painting and I'd have to start over. But, I'd say that overall spray painting was a fun medium to use.

     If you would like to go on this epic art adventure with me, next week we will be doing...


     If you choose to follow along, please post your work using #52weekartadventure!

Friday, August 9, 2019

52 Weeks of Art: Week 6

Week 6: Gouache


Welcome to week 6 of 52 weeks of art! What are we doing this week?


     Gouache! What is it? How do you say it? Goo-ake? Gowch? Gohsh? Wrong. Wrong. And Wrong. It's Gwahsh. Languages, right? I don't even pretend to understand how that one works. My Little One kept calling it goulash, though. We all had a good laugh about that. Except the Little One. She was not amused. Goulash isn't something you can paint with, but it is a tasty food you can eat - maybe while painting with some gouache.
     So, what is gouache? The Oldest and I decided it was a lot like watercolors and acrylics got together and made a little paint baby. That paint baby is gouache. It can be watered down and used like watercolors, but it can also be used without watering it down for a more opaque look. It's an interesting paint, that's for sure. It dries VERY matte, no shine to it whatsoever. Also, the light colors dry darker and the darker colors dry lighter. Very frustrating if you don't know this ahead of time. So, keep that in mind if you decide to try out gouache!
     Now, I did not have gouache before I started. Well, okay, I had blue, yellow, red, purple, and white. So, I guess I really could have made any color I wanted. I just didn't want to make ALL my own colors. So, off to the internet! Amazon, here I come! I love Amazon. You really can buy anything there. And the shipping! I ordered these and got them the next day. Awesome. Also, it was such a good deal. I got 60 colors that ended up costing about $0.59 each!

Gouache set I bought here on Amazon


     Since gouache is similar to watercolor and acrylic I decided to test it out on some sample papers to see which type of paper I liked the best. I went with the cold press watercolor, hot press watercolor, and hot press illustration board again. You know, what I had on hand.

Left to right: cold press, hot press, illustration board.

        The Little One and Sassy, my niece, helped me decide which paper to use. We all had a fun time painting. Both the Little One and Sassy liked the illustration board the best. I liked the hot press watercolor paper. Our least favorite was the cold press. I think that if I had used it more like watercolor and less like acrylic then I would have liked the cold press better. However, I hardly watered it down at all. So, hot press paper for me!

   
All set up and ready to paint!
      Did you notice my little paint brush stand?

Look at that quality detail!

Pretty awesome, right?
     I made that. You're just a little bit jealous right now, aren't you? I get it. It's pretty awesome. I used some wire from our wire making week and bent it all into shape. I like it. I think it turned out pretty great. It was also super simple to make if you want to make your own.

And on to the actual painting...

Ta-da!

Here's a close up!


     In case you can't tell, it's a peacock feather! I don't know if you can really tell from the photo, but the inside of the feather dried darker than the outside of the feather. Remember that whole thing about the paint drying into a different shade? Yeah, so that happened. I still think it turned out alright.

Bonus picture!

The Little One's painting!
     This is the painting the Little One did. She's not going to be happy that I shared this one here, but I absolutely love this little painting of hers!


On to rating gouache...

     Just a reminder on the criteria for rating each medium.

Ease of use: How easy was this medium to use.

Affordability: How affordable supplies are for each medium.

Accessibility: How easily accessible supplies are for each medium. Example, are specific tools required that are hard to find?

Fun to Use: How much enjoyment I got out of using this medium

     So, for gouache my rating is: 18

Ease of use: 5
    So very easy to use! Even though it's the lovechild of watercolor and acrylic, the dry time is much quicker than watercolor. I did not have to wait long between each layer. Phew. I'm not a very patient person. The paint was smooth and I could have just painted with it all day. 

Affordability: 3
     This is another one of those you have to buy it to use it mediums. It's not as popular as watercolor or acrylics, so not as easy to find in local craft stores. Local art supply stores, though? Oh yeah, no problems there. You know where else you can get it? The internet. I bought 60 colors for $35ish. At $0.59 a color, I'd say that's pretty affordable. You also don't have to buy an entire set of colors. There really are lots to choose from. High end all the way down to the cheap stuff. The paper I think is where most of the cost will be. Paper can be more pricey if you get the good stuff. If you're just trying this out, you could even just paint on some cardstock and you'd be just fine.

Accessibility: 5
     You can get paper and brushes from any arts and crafts stores. Gouache isn't as popular as other paints, so finding it at a craft store will be more difficult. An art supply store will have it. So will the internet.

Fun to Use: 5
     I loved this. The paint was just so smooth to work with. The colors were beautiful. I will definitely be painting with gouache again in the future!

     If you would like to go on this epic art adventure with me, next week we will be doing...


     If you choose to follow along, please post your work using #52weekartadventure!

Friday, August 2, 2019

52 Weeks of Art: Week 5

Week 5: Ink


Welcome to week 5 of 52 weeks of art! What are we doing this week?


     Ink painting! I was both excited and nervous about doing this one. I don't even know why I was nervous! Maybe just because it was something new and different. Well, turns out it's not so different than things I've done before. It's actually a lot like watercolor, but without all the color. It's just black. Here's a few examples of some pretty awesome ink paintings:

I love this crow painting!
   
I love this, found it here.

     Before I began my ink painting adventure, I did a little research. I had to find some ink, obviously. So, to the internet! Who knew there were so many different types of ink? Probably artists that use ink all the time. Well, the two inks that were the most popular, or maybe just easiest to find, were sumi ink and India ink. What's the difference between the two? According to Google (thanks, Google), sumi ink dries matte and India ink looks shiny and plastic-y when dried. I went with sumi ink. Rebecca Johnson used India ink. Look her up on Instagram @rebeccajohnsonartwork to see what she created. She's pretty awesome, you should check her out.

     Alright, so, now that I have my ink all picked out, I need to select a paper to use. Paper. Wow. So MANY choices, right? Seriously. I had some cold press watercolor paper, hot press watercolor paper, and some hot press illustration board laying around the house. Alright, so not really just laying around the house - it was put away. I tried all three to see which one I liked the best.

Sumi ink and various papers.

Trying out the ink on different papers.

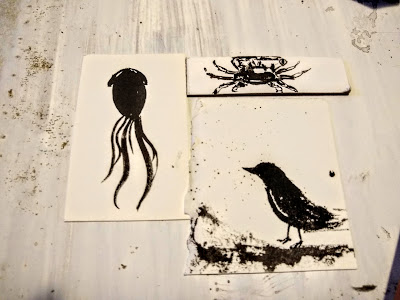
     So, here's my test paintings. The crab is on the illustration board. The squid, can you tell it's a squid? It's on the hot press paper. The crow is on the cold press watercolor paper. These were all just quick little paintings to decide which paper to use. I liked the way the ink turned out on all of them, but I think it flowed the best on the hot press paper - the squid. The cold press was too rough and the illustration board just felt weird. I know, it's not really an explanation, but it just didn't feel right to me. So, I went with the hot press paper.


Deciding which paper I like best.

And here's my final ink painting! It's a dragon.


Finished painting - Dragon.

One more picture of my dragon.

     And that's my ink painting adventure. You know, I had a lot of fun with this one. I'll be doing some more ink painting in the future. I don't know when, but if I ever find the time I'll be doing it. 


On to rating ink painting...

     Just a reminder on the criteria for rating each medium.

Ease of use: How easy was this medium to use.

Affordability: How affordable supplies are for each medium.

Accessibility: How easily accessible supplies are for each medium. Example, are specific tools required that are hard to find?

Fun to Use: How much enjoyment I got out of using this medium

     So, for ink painting my rating is: 18

Ease of use: 5
    Sumi ink was very easy to use. It's a lot like using watercolor paints, but without all the wait time of watercolors. I found that the ink dried quickly - not so quick that I didn't have time to use it, though. Because of the quick dry time I didn't have to wait long between layering the ink on the paper.

Affordability: 3
     This is one of those mediums that you'll have to buy to use. The ink I have is about $10. You can buy pads of paper for anywhere between $8 - $40. You can also get a good set of brushes for as little as $10. So, you're looking at around $30 for basic supplies. Good news, though, the ink is going to last you for a long time. I used very little with my paintings. The brushes will last for many years if you take good care of them. The paper, well, that's where most of your cost comes from. 

Accessibility: 5
     You can get paper and brushes from any arts and crafts stores. I'm not so sure about the ink being in a craft store. An art store definitely. Also, you can order any of these things online. Amazon is amazing for that.

Fun to Use: 5
     I really enjoyed ink painting. I liked the flow of the ink over the paper. Something about it was mesmerizing? Meditative? Relaxing? Whatever the word is, I liked it.

     If you would like to go on this epic art adventure with me, next week we will be doing...


     If you choose to follow along, please post your work using #52weekartadventure!

Friday, July 19, 2019

52 Weeks of Art: Week 3

Week 3: Food Art


Welcome to week 3 of 52 weeks of art! What are we doing this week?


     Now, you might be wondering what food art is. Yeah, me too. There were so many different ways we could have gone with this one. We could have made some art out of food. Like this...

Amazing, right?

     Or, we could have made some stamps from food and made some food stamped art!

Fun, right?

     In the end, we decided to go with cookies. Now, even with cookies we could have done different things! We chose to paint the cookies. Painted cookies? Yeah, it's a thing. And it's amazing! Just Google hand painted cookies. Go ahead, I'll wait. Check out these awesome cookies!

I found these here

     Here's some photos of me making cookies.

Getting ready to roll out some dough. Thanks Alton Brown for the recipe!

     I had to cut out my 3" x 3" squares. I have a bazillion cookie cutters. You want a dinosaur? I got 20. You need a heart? What size, I've got every one. You need your state? Where do you live? I've got all 50 states. You need a voodoo doll? Zombie? Check. Double check. Need a square? Uh... nope. Don't have one of those. Luckily, I have a ruler and a knife!
Cutting cookies into 3x3 squares

Baked and ready to ice. 
Look how shiny that icing is!

     While my icing was drying - which takes forever, by the way - I gathered up my supplies! I used AmeriColor for my paint. You can get it here on Amazon for $26 for 12 colors. FYI a little bit goes a LONG way. This stuff will last a long time.


Got my supplies all ready to go.

     In case you were wondering, the vodka was for the painting, not for drinking. However, I guess if you want to drink and paint cookies at the same time you could. I'm not a drinker, just a cookie painter.


Did some painting. Waiting for it to dry. 

     I added all the finishing touches with a food safe pen. 

Added the finishing touches!

Done!

Done!

It's a flower!

It's a field of flowers, can you tell?

     Well, what do you think of my cookie painting? I had fun doing it. The kids had fun painting the cookies too. And eating them. What's better than eating your work?


On to rating cookie painting...

     Just a reminder on the criteria for rating each medium.

Ease of use: How easy was this medium to use.

Affordability: How affordable supplies are for each medium.

Accessibility: How easily accessible supplies are for each medium. Example, are specific tools required that are hard to find?

Fun to Use: How much enjoyment I got out of using this medium

     So, for cookie painting my rating is: 19

Ease of use: 4
    Painting cookies was easy. Especially if you have any sort of painting experience. You just have to be careful not to poke holes in your icing. I don't know, maybe I just didn't wait long enough for my icing to dry.

Affordability: 5
     Cookies are really cheap to make. And pretty much anyone can bake a cookie, right? You don't need fancy cookie cutters, you can just freehand cutting your own designs. $26 for some food color gel might seem like a lot, but you can just buy individual colors. Also, a little bit of color goes a long way. You'll be able to paint MANY cookies with your food coloring.

Accessibility: 5
     You can get everything you need to bake your cookies and make icing at any grocery store. Food color gel can be found online or in specialty baking stores.

Fun to Use: 5
     I had fun painting cookies. I think the best part of painting cookies is having cookies to eat when you're done.

     If you would like to go on this epic art adventure with me, next week we will be doing...


     If you choose to follow along, please post your work using #52weekartadventure!