Showing posts with label cross stitch. Show all posts

Friday, August 16, 2019

52 Weeks of Art: Week 7

Week 7: Cross Stitch


Welcome to week 7 of 52 weeks of art! What are we doing this week?


     I have been looking forward to doing cross stitch! It's sort of my thing. If you're not familiar with cross stitch, let me explain what it is. It's a series of  X's stitched onto fabric. Confused? Let me show you some photos.


     Cross stitch is typically done on Aida fabric. The fabric has a grid on it that makes it super easy to stitch little X's all over it. But you can cross stitch on just about anything, it doesn't have to been done on Aida fabric.

Check out this amazing cross stitch done on a wooden bag! I love it!

I found this amazing piece here.

I'm in love with this chair! I want one.

I found this chair and other unique cross stitch projects here.

Alright, so these are tattoos, but they are done to look like cross stitch. Pretty amazing.

I found these and others here.

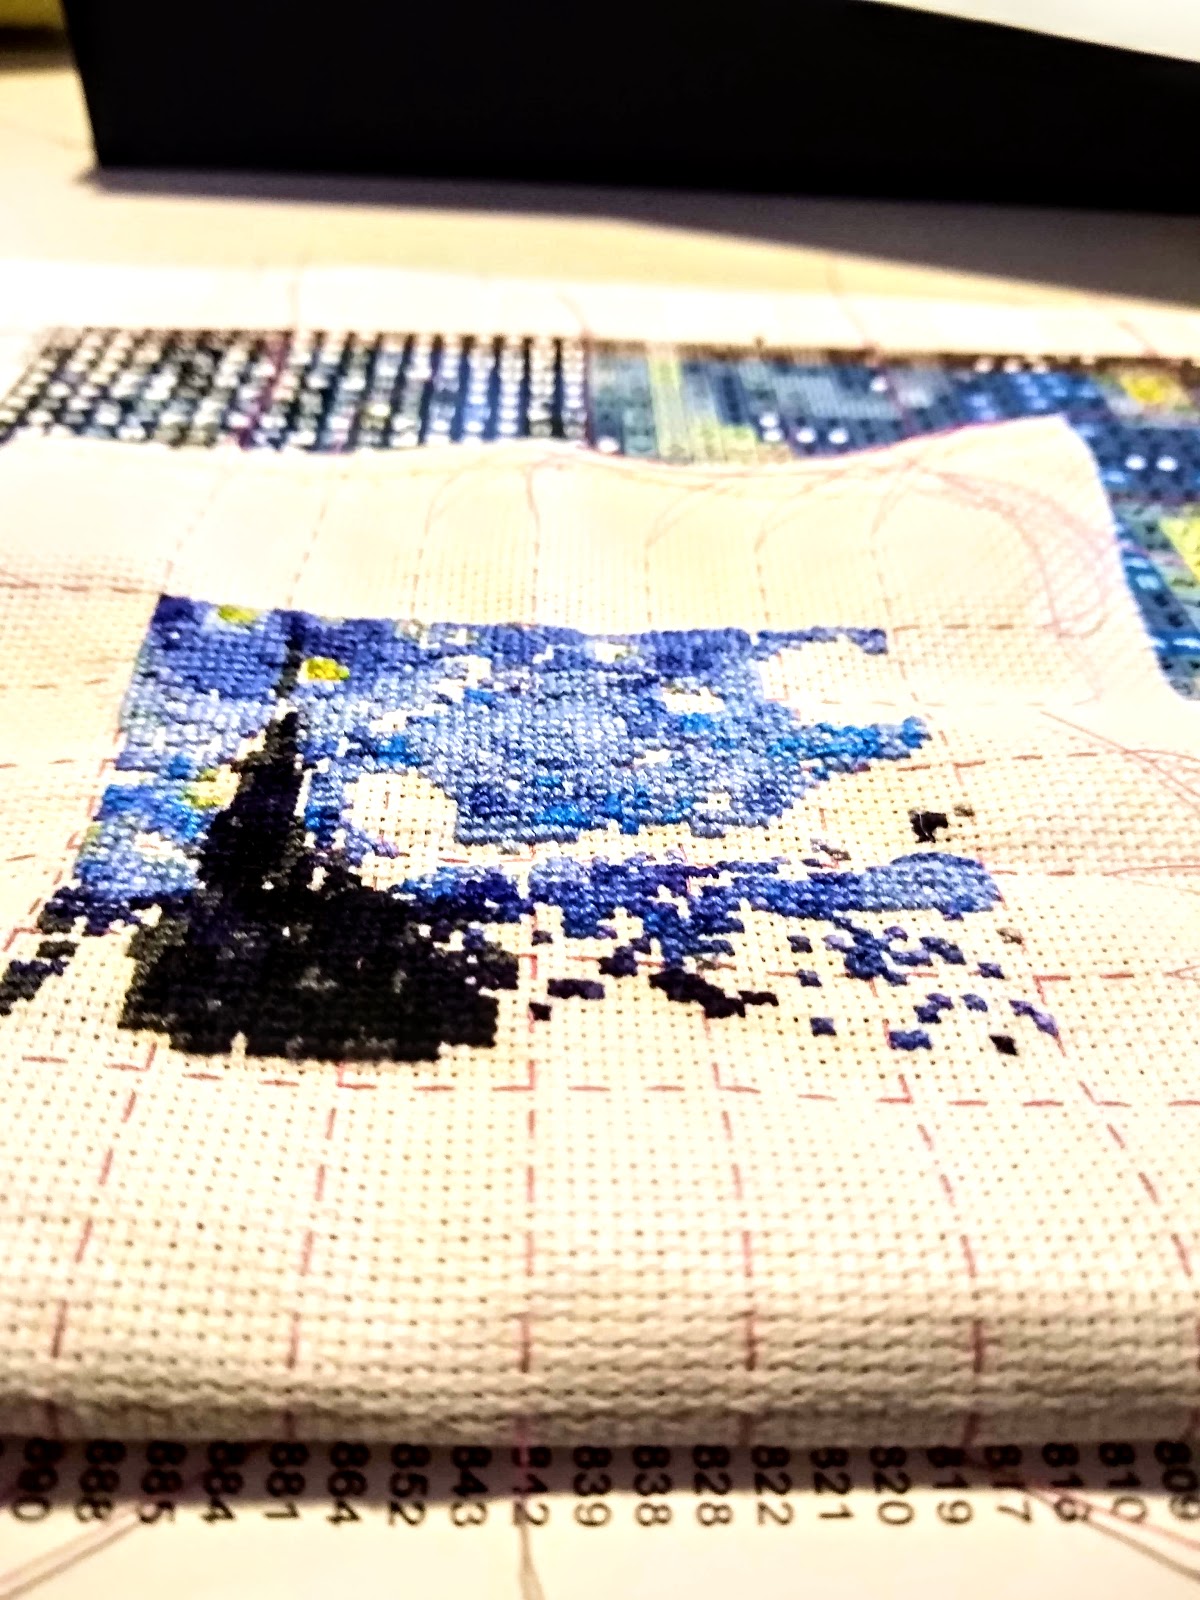
     For my cross stitch project this week I wanted to do something a little extra. We're doing tiny art, so this needed to be small. So, instead of using the standard 14 count Aida fabric, I went with 20 count. What does that mean? Well, let's take a look at this photo below. Here we have Clyde stitched up on three different sizes of Aida. Far left is 6 count, middle is 14 count, and right is 20 count. You can see that the larger the count, the smaller the design. So, tiny art project = 20 count Aida. 

You can read more about Aida sizes here.

     Here's the beginning of my tiny cross stitch project! First thing I needed to do was stitch in some guide lines. I am so glad that I did that, I couldn't have finished this project without these guide lines. Well, I probably could have finished, but it would have been extremely difficult.


     Then, I gathered up all my stitching supplies and got to work... There's a lot of photos, I know.

Cut out my piece of fabric.

Stitching up my guide lines

Close up of my pattern.

And so it begins...

This is going to take a while.

Have I even done anything?

Several hours later...

Days of work here.

It looks the same!

This is my life now.

I can't even tell I've been working on this for the past 6 hours!

This is never going to end!

What was I thinking?

Sooo close to being done!

Almost there!

The final few stitches!

55 hours of work later.

Here's the backside. The Oldest thinks it looks more like the painting than the front does.

My father-in-law made this frame for me. This one turned out too big, so he made me another one.
I didn't get a picture of that one.

My father-in-law is amazing! This frame fits PERFECTLY!

And DONE!!!


     I had a real love/hate relationship with this project. I know you can't really tell from the photos, but this turned out to be just under 3" wide. So yeah, it's tiny. I really loved how it turned out, but I struggled with getting it done in a week. I don't know what I was thinking. Anyone who tells you that tiny art is easier/quicker because it's tiny is lying to you. Tiny does not equal quick and easy. Not. At. All. I look at the finished piece and I think, "wow. I did that."


Here's a picture of my holding it, just so you can see how tiny it really is. 

So tiny!

Would you like to stitch up your very own Tiny Starry Night? Here's the pattern!


On to rating cross stitch...

     Just a reminder on the criteria for rating each medium.

Ease of use: How easy was this medium to use.

Affordability: How affordable supplies are for each medium.

Accessibility: How easily accessible supplies are for each medium. Example, are specific tools required that are hard to find?

Fun to Use: How much enjoyment I got out of using this medium

     So, for cross stitch, my rating is: 18

Ease of use: 5
    Easy to use, even a beginner can do it! Especially if you stitch on the 6 count Aida. It just takes time. But who doesn't like stabbing something a thousand times? 

Affordability: 3
     Embroidery floss is not expensive. However, when you need to use MANY different colors, that's when it starts to add up. Each skein of floss costs $0.60 - $0.80, depending on where you get it from. Good thing though, one skein makes a lot of little X's. Aida fabric is also very affordable.

Accessibility: 5
     You can get embroidery floss and Aida fabric at any arts and crafts store. There are also several online stores where you can buy supplies. I like to buy my floss online because I get distracted by all the pretty colors and want to buy some of everything.

Fun to Use: 5
     I love to cross stitch. It's one of my favorite things to do. I love that stitching up a bunch of little X's turns into a picture. It's amazing. Also, it's nice stress relief - you know, all the stabbing really helps.

     If you would like to go on this epic art adventure with me, next week we will be doing...


     If you choose to follow along, please post your work using #52weekartadventure!

Friday, March 22, 2019

Introducing HugSandwich Embroidery and Cross Stitch Kits!

HugSandwich Embroidery Kit 
HugSandwich Bite Size Cross Stitch Kit
Each HugSandich Embroidery Kit comes with everything you need to stitch up your very own masterpiece!
Kits Include:
     Pre-Printed Cotton Fabric
     4" Wooden Embroidery Hoop
      Embroidery Needle
      Floss Card with all DMC Floss needed to complete design
      HugSandwich Illustrated Basic Stitch Guide
      Instruction Card
      Backing Paper
      Love

Cactus Embroidery Kit - pre-printed fabric, instruction card, floss card

Three designs to choose from: Doughnut, Cactus, and Swallow

Doughnut, Cactus, Swallow - stitched up

HugSandwich Bite Size Cross Stitch Kits include everything you need to stitch up your own Bite Size Pixel Princess!
Kits Include:
     6 Count Square of Aida Fabric
      4" Wooden Embroidery Hoop
      Embroidery Needle
      Floss Card with all DMC Floss needed to complete bite size pixel princess
      HugSandwich Illustrated Basic Cross Stitch Guide
      Instruction Card
      Backing Paper
      Love

Choose which Princess you want in your kit in either a ball gown or plain clothes


Bite Size Princess Ball Gown

Bite Size Princess Plain Clothes


Friday, October 6, 2017

Framing in an Embroidery Hoop

You've just finished your embroidery/cross stitch masterpiece! Congratulations!

What's next?

You'll want to frame it, of course, so you can share it with everyone. Standard frames are always a nice option, but their prices are not always nice. A cheap, easy, and adorable option is to frame your masterpiece in an embroidery hoop.

Items needed to frame in a hoop:

  • Embroidery/Cross Stitch Masterpiece
  • Hoop that fits your masterpiece
  • Felt
  • Pencil
  • Needle
  • Heavy Duty Thread
  • Scissors
  • Craft Glue


Items needed to frame in an embroidery hoop


First things first, iron your masterpiece! You do NOT want to go to all the work of framing it without ironing out all the wrinkles. Trust me on this.

Step Two: Take the inner hoop and trace around it on the felt. Cut out your felt circle and set it aside for later.

*Side Note* If you want to decorate your hoop, do it now! Paint it, wrap it in ribbon, whatever you want! Just make sure it's dry before putting your masterpiece in it.

Step Three: Put your masterpiece in the hoop. You'll want the screw at the top, so make sure it's centered nicely. Pull the fabric until it's taut and tighten the screw. Repeat until the fabric is as taut as can be and the screw is nice and tight. Good job!


Step Three: Fabric is taut, screw is tightened. Good job!


Step Four: Get out your needle and thread, it's time to sew! You'll want to use a heavy duty thread to help you with this part. If you don't have any heavy duty thread on hand, just double up on whatever you have handy. Cut your thread long enough to go around your hoop twice. Make a big knot in the end of your thread. Using a large running stitch, stitch around the hoop about 3/4" away from the hoop.


Step Four: Large running stitch around the hoop. I realize now that using WHITE thread was not such a good idea. Sorry!


Step Five: Trim your fabric close, but not too close, to your running stitches. Was that vague enough?


Step Five: Trimmed fabric. Job well done! 


Step Six: Take the loose ends of thread and pull them tight. When it's good and tight, tie the ends together. Looking good!


Step Six: Pull threads tight and tie them in a knot.


Step Seven: We're almost done! Remember that felt circle we cut out earlier? Yeah, we're going to need that now. Take your felt circle and glue it to the back of the hoop with your craft glue. Let it dry. Seriously, this part is important!


Step Seven: Glue your awesome felt circle to the hoop with some craft glue.


Step Eight: You've made it, we're done! Enjoy your masterpiece! Give yourself a pat on the back for a job well done.


Step Eight: Enjoy your hard work! 


Piece of cake, right? Now go - craft, create, and frame everything you make!

Tuesday, January 17, 2017

To Hoop Or Not To Hoop

To hoop or not to hoop...that is the question. It's a very important question and I've been asked it before. But, to be honest, I've never really been sure how to answer it. When it comes to cross stitching I hardly ever use a hoop. However, if I'm going to embroider something I will almost always use one. So, how to answer that question? Let's look at some pros and cons of using and not using a hoop and we'll go from there.

Pros:

  • Keeps the fabric taut as you work 
  • Helps keep your stitches even and consistent
  • Basic wooden hoops are very cheap and affordable
  • Hoops are portable and can be used anywhere
Cons:

  • You will almost always have a ring left in your fabric from where your hoop was
  • Floss will most likely get caught on the screw of the hoop
  • Hoops can damage existing stitches
  • Hoops that are not cleaned properly can leave dirt on your fabric
Now that you are aware of some of the pros and cons of using a hoop, let's talk about the hoops themselves. They come in a variety of shapes and sizes, as well as different materials. You can get anywhere from less than 3" to 11" or even larger. You can get circles, ovals, rectangles, and squares. They come in wooden, plastic, or metal. How will you ever know which one works best for you? My suggestion? Hold it in your hands. Does it feel comfortable? Can you easily reach the center of the hoop to work? If you answered yes to the previous questions then it's probably a good choice. Try it out. If you can't comfortably stitch in the center of the hoop, try a smaller size.

Here's a few things to keep in mind if you choose to use a hoop:

  • Remove the hoop whenever you are not stitching
  • Always keep the screw of the hoop on the opposite side of your thread to prevent tangling
  • Ensure that your hoop is clean before every use
If you've never stitched without a hoop, give it a try. Who knows, maybe you'll like it!

Tuesday, January 10, 2017

Does Size Matter?


What size works best?
How do you know which count fabric to use? 14 count is the standard, and all HugSandwich cross stitch patterns are sized for 14 count. Does a HugSandwich cross stitch pattern still work for 11 count? 18 count? Any size? Yes! Every pattern can be used for any size fabric. The only difference will be the size.
6 count, 8 count, 11 count, 14 count, 16 count, 18 count, 20 count
How does sizing work? What does 14 count even mean? The number, or count, is how many stitches there are in one inch. So, 14 count has 14 stitches per inch. 20 count has 20 stitches per inch, etc. To make it simple, the smaller the number, the bigger the finished project. The bigger the number, the smaller the finished project. Here are a few examples of Clyde, the orange Pac-Man ghost, stitched on various counts of fabric for size comparison.


6 count, 14 count, 20 count
In this photo of Clyde we have 14 count in the middle. Clyde just so happens to be 14 stitches across, making him exactly 1" on the 14 count Aida. He is 2 1/4" across on the 6 count and he's approximately 3/4" on the 20 count.
6 count, 20 count
Here we have Clyde on the 6 count and on the 20 count just for comparison. So, does size matter? You decide.

Tuesday, January 3, 2017

How Many Threads Do You Need?

Have you ever wondered how many threads you should be using to stitch up a project? Standard cotton embroidery floss comes in six strands. It's meant to be pulled apart, the strands used separately. Do you know how many strands to use? Should you use only one? Two? Three? How many? There are so many choices! The standard for cross stitch is using just two strands stitched on 14 count Aida. I have stitched up an example using a variety of  strands. As you can see, using only one thread does not provide very much coverage. But there are times that using only one strand is useful. Doing back stitching, french knots, and fine detail work are all ideal for one strand. Two strands provides good coverage for standard cross stitches. You might want to use three strands if you are using a light color on a darker fabric (or a dark color on a light fabric), it provides more coverage so the color of the fabric doesn't show through as much. Three strands fills it out even more. When you use more than three strands you start to lose the details of the pattern. As you can see in the photo, the heart that I stitched with six strands has lost most of the detail, the heart is not as easy to see as it is with only two strands.
I had a very difficult time stitching with four - six strands. However, if you were using a larger count (6, 8, or 11) using more than three strands would be just fine. If you are stitching on a smaller count (18 or 20) using just one would also be just fine. But who am I to tell you how to stitch up your project. It's yours! So make it your way.

Tuesday, December 13, 2016

Basic Cross Stitching Tips

Here's a handy chart for the basics of cross stitching! 
More tips and tricks to come soon!

Tuesday, November 29, 2016

Cross Stitching Basics

Not sure where to start? Here's a quick how-to guide on the basics of cross stitching!
Cross Stitching Basics by HugSandwich